IDE Integration
Code editors and IDEs work differently than interactive shells.
Usually, they will either inherit the environment from your current shell (this is the case if you start it from a terminal like nvim . or code .) or will have their own way to set up the environment.
Once you have launched the IDE, it won't reload the environment variables or the PATH provided by mise if you update your mise configuration files. Therefore, we cannot rely on the default mise activate method to automatically set up the editor.
There are a few ways to make mise work with your editor:
- Some editors or IDE plugins have direct support for
miseand can let you select the tools/sdk path from the IDE settings. This will let you access to the tool binaries but won't load the environment variables. - Most editors (and language plugins) will look for tools on the
PATHand run them in the context of your project. Therefore, adding themiseshims to thePATHmight be enough (see below). This will run the tool provided by mise and load the environment variables. - In other cases, you may need to manually indicate the path to the tools provided by
misein the IDE settings. This can be done by usingmise which <tool>ormise where. You can also provide the path to the tool shim (e.g.~/.local/share/mise/shims/node) if the plugin supports it as this will also load the environment variables when the tool is run. - Finally, some custom plugins have been developed to work with
mise. You can find them in the IDE Plugins section.
Adding shims to PATH in your default shell profile
IDEs work better with shims than they do environment variable modifications. The simplest way is to add the mise shim directory to PATH.
For IntelliJ and VSCode—and likely others, you can modify your default shell's login (aka "profile") script. Your default shell can be found with:
dscl . -read /Users/$USER UserShellgetent passwd $USER | cut -d: -f7You can change your default shell with chsh -s /path/to/shell but you may need to first add it to /etc/shells. Once you know the right one, modify the appropriate file:
# ~/.zprofile
eval "$(mise activate zsh --shims)"# ~/.bash_profile or ~/.bash_login or ~/.profile
eval "$(mise activate bash --shims)"# ~/.config/fish/config.fish
if status is-interactive
mise activate fish | source
else
mise activate fish --shims | source
endWARNING
Do not use /bin/bash or /usr/bin/bash on macOS. bash is complicated, decades old, and mise isn't able to use as many features. Unless you consider yourself an expert on bash and know why I (and Apple for that matter) admonish using bash, just use zsh on macOS.
On Linux this is read when logging into the machine, so changing it requires logging out and back in for it to work. See #vscode below for how to get VSCode to read the login file.
This assumes that mise is on PATH. If it is not, you'll need to use the absolute path ( e.g.: eval "$($HOME/.local/bin/mise activate zsh --shims)").
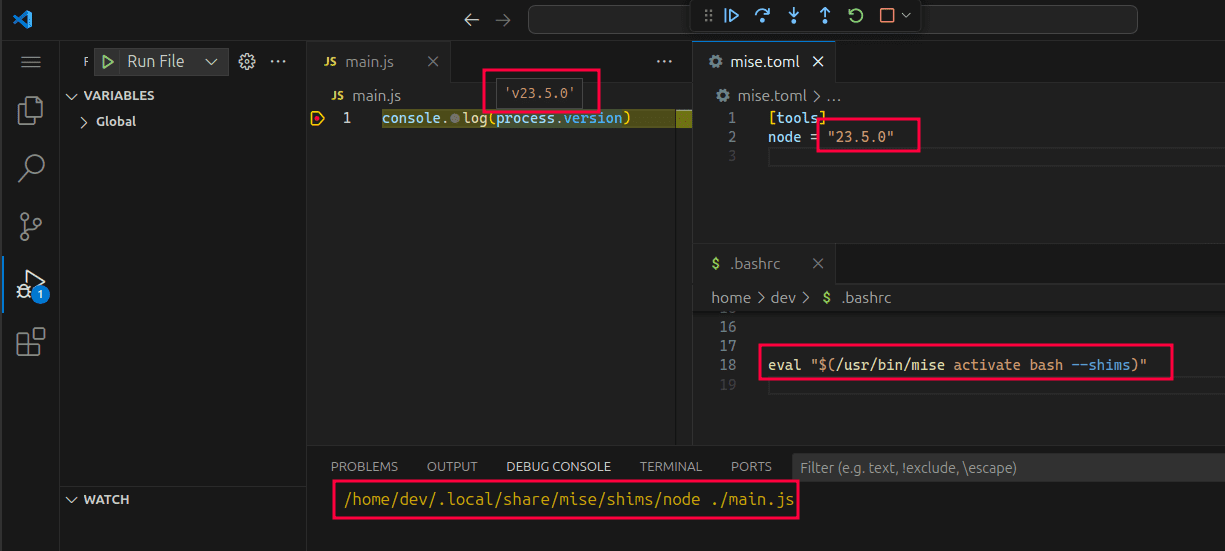
Here is an example showing that VSCode will use node provided by mise:

As mentioned above, using shims doesn't work with all mise features. For example, arbitrary env vars in [env] will only be set if a shim is executed. For this we need tighter integration with the IDE and/or a custom plugin.
IDE Plugins
Here are some community plugins that have been developed to work with mise:
- Emacs: mise.el
- IntelliJ: intellij-mise
- VSCode: mise-vscode
Vim
" Prepend mise shims to PATH
let $PATH = $HOME . '/.local/share/mise/shims:' . $PATH
Neovim
-- Prepend mise shims to PATH
vim.env.PATH = vim.env.HOME .. "/.local/share/mise/shims:" .. vim.env.PATH
For a better Treesitter and LSP integration, check out the neovim cookbook.
emacs
Traditional shims way
;; CLI tools installed by Mise
;; See: https://www.emacswiki.org/emacs/ExecPath
(setenv "PATH" (concat (getenv "PATH") ":/home/user/.local/share/mise/shims"))
(setq exec-path (append exec-path '("/home/user/.local/share/mise/shims")))
Use with package mise.el
https://github.com/eki3z/mise.el
A GNU Emacs library which uses the mise tool to determine per-directory/project environment variables and then set those environment variables on a per-buffer basis.
(require 'mise)
(add-hook 'after-init-hook #'global-mise-mode)
JetBrains Editors (IntelliJ, RustRover, PyCharm, WebStorm, RubyMine, GoLand, etc)
IntelliJ Plugin
https://github.com/134130/intellij-mise
This plugin can automatically configure the IDE to use the tools provided by mise. It has also some support for running mise tasks and loading environment variables in the run configurations.
Direct SDK selection
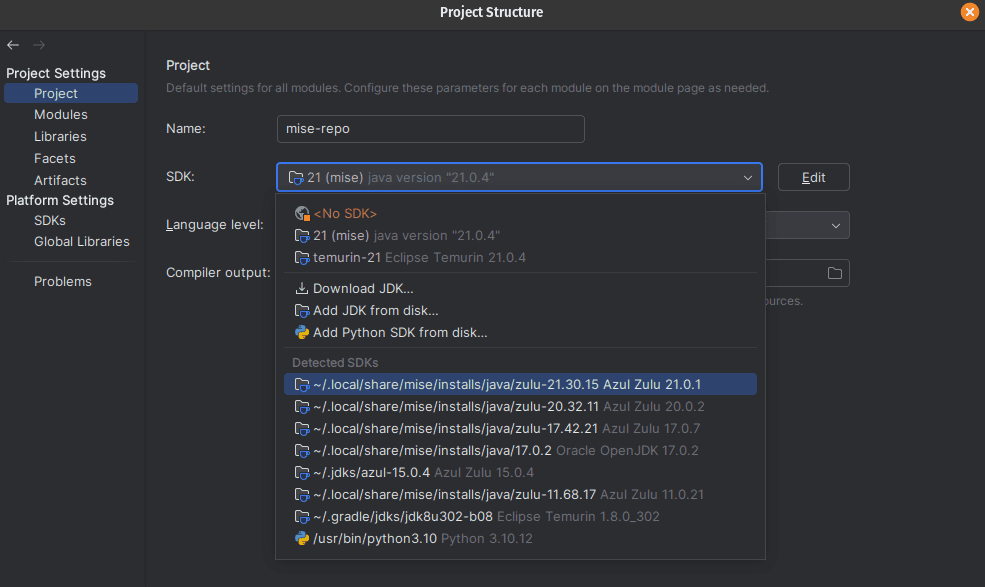
Some JetBrains IDEs (or language plugins) have direct support for mise. This allows you to select the SDK version from the IDE settings. Example for Java:

SDK selection using asdf layout
Some plugins cannot find SDK installed by mise yet but might have support for asdf. In that case, a workaround is to symlink the mise tool directory which has same layout as asdf:
ln -s ~/.local/share/mise ~/.asdfThen they should show up on in Project Settings:
Or in the case of node (possibly other languages), it's under "Languages & Frameworks":
VSCode
VSCode Automation Profile for macOS
Unlike Linux, macOS does not read the login shell profile (~/.profile, or ~/.zprofile) when logging into the machine. You'll likely want to add this setting to VSCode config in order to have it load your shims:
    "terminal.integrated.automationProfile.osx": {
        "path": "/usr/bin/zsh",
        "args": ["--login"]
    }
TIP
You can also use ["--login", "--interactive"] if you want to include ~/.zshrc.
VSCode Plugin
There is a VSCode plugin which can configure other extensions for you, without having to modify your shell profile to add the shims to PATH.
In addition, it provides additional features such as:
- Automatic configuration of other extensions to use tools provided by
mise - Manage
misetasks, tools, and environment variables directly from VSCode - Load environment variables from
mise.tomlfiles in VSCode - Support for autocompletion and snippets for
mise.tomlfile - Integration with VSCode tasks
https://github.com/hverlin/mise-vscode/ (Documentation)
Use mise exec in launch Configuration
While modifying your default shell profile is likely the easiest solution, you can also set the tools in launch.json:
mise exec launch.json example
{
  "configurations": [
    {
      "type": "node",
      "request": "launch",
      "name": "Launch Program",
      "program": "${file}",
      "args": [],
      "osx": {
        "runtimeExecutable": "mise"
      },
      "linux": {
        "runtimeExecutable": "mise"
      },
      "runtimeArgs": ["exec", "--", "node"]
    }
  ]
}
Xcode
Xcode projects can run system commands from script build phases and schemes. Since Xcode sandboxes the execution of the script using the tool /usr/bin/sandbox-exec, don't expect Mise and the automatically-activated tools to work out of the box. First, you'll need to add $(SRCROOT)/mise.toml to the list of Input files. This is necessary for Xcode to allow reads to that file. Then, you can use mise activate to activate the tools you need:
# -C ensures that Mise loads the configuration from the Mise configuration
# file in the project's root directory.
eval "$($HOME/.local/bin/mise activate -C $SRCROOT bash --shims)"

swiftlint